Blumenhofer Acoustics ManualHandbuch für Blumenhofer AcousticsManuale di Blumenhofer Acoustics
 |
6 - Positioning of the loudspeakers6 - Aufstellung der Lautsprecher6 - Posizionamento dei diffusori
Positioning of the speakers pretends some experimentation to obtain the optimal sound result. Goal of the experimentation is to optimize the interaction between speakers and listening room. Es lohnt sich auf jeden Fall, die Position der Lautsprecher solange zu verändern, bis sie im jeweiligen Hörraum optimal klingen! Trovare il posto giusto in cui piazzare le casse richiede una certa pazienza e sperimentazione per ottenere il migliore risultato sonoro. L’obiettivo è ottimizzare l’interazione tra le casse e la sala d’ascolto. |
Positioning of the loudspeakers:
• Decide which is going to be your listening spot;
• Do not put your listening spot to near to the back wall of the room: it will give you an excess of bass and reduce its definition and its precision;
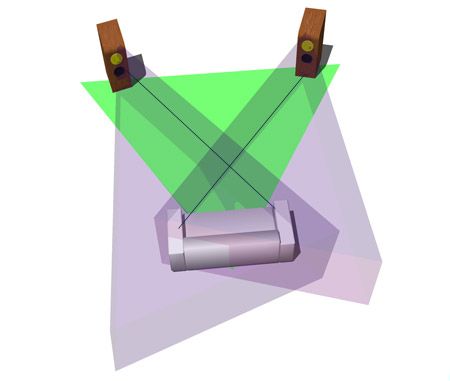
• Place the speakers and the centre of the listening area approximately at the corners of a isosceles triangle;
• The speaker should be at the same distance from the listening spot
• Keep the speakers at least 1.5m (5ft) apart from each other to maintain left-right stereo separation;
• Keep the speaker at least 0.5m (20in) away of walls.
• If you put the speaker too close to the walls, the level of bass relative to midrange increases and this might give a boomy touch to the sound;
• Keep the two loudspeaker at the same distance from rear wall
• The distance between the left speaker and the left wall should be equal to the distance between the right speaker and the right wall
• Point the speakers directly to your ears, and then turn the left speaker clockwise and the right speaker counterclockwise open of about 10°-15° in order to have the sound wave to pass you by
• Once you have found a rough position, place masking tape on the floor, in order to identify clearly their position. Mark the tape in 2cm increments. This will allow you to move each speaker exactly the same amount, without having to re-measure each time.
• Proceed with the fine adjustment of the speakers’ position moving them centimeter by centimeter and degree-by-degree until you find the perfect spot and direction that suits Your tastes. Take your time to perform this process, it might take some weeks of trying and errors
• Even small changes in the position of the speakers or the listeners can have a profound effect on the perceived sound quality
Room - Loudspeakers interaction:
• Moving the speakers further from the walls will reduce the general level of bass;
• Moving the speakers closer to the walls will increase the level of bass;
• Space behind the speakers helps to create an impression of depth;
• If the central image is weak, try moving the speakers closer together or toeing them in but do not direct them straight to the listeners.
Fine tuning of the equipment:
• Make sure that all the connections in the installation are correct and secure
• Check the phase of the electrical devices
• Respect the power supply connection priority of the devices: the devices with lower power demand should be the first from the wall
• Connect devices with switching power supply on a different wall plug than devices with analog power supply
Fine tuning of the room:
• If the level bass is uneven, very often is due to the excitation of resonance modes in the room
• Large pieces of furniture can have an effect on the overall frequency distribution inside the room
• To reduce the harshness of the sound, increase the amount of soft furnishings in the room (for example use heavier curtains, carpets, cushions)
• If the sound is dull and lifeless reduce the amount of soft furnishing in the room
• If your room has flutter echo (to test for it clap your hands and listen for rapid repetitions), reduce them by the use of irregular shaped surfaces such as bookshelves and large pieces of furniture
• Decide which is going to be your listening spot;
• Do not put your listening spot to near to the back wall of the room: it will give you an excess of bass and reduce its definition and its precision;
• Place the speakers and the centre of the listening area approximately at the corners of a isosceles triangle;
• The speaker should be at the same distance from the listening spot
• Keep the speakers at least 1.5m (5ft) apart from each other to maintain left-right stereo separation;
• Keep the speaker at least 0.5m (20in) away of walls.
• If you put the speaker too close to the walls, the level of bass relative to midrange increases and this might give a boomy touch to the sound;
• Keep the two loudspeaker at the same distance from rear wall
• The distance between the left speaker and the left wall should be equal to the distance between the right speaker and the right wall
• Point the speakers directly to your ears, and then turn the left speaker clockwise and the right speaker counterclockwise open of about 10°-15° in order to have the sound wave to pass you by
• Once you have found a rough position, place masking tape on the floor, in order to identify clearly their position. Mark the tape in 2cm increments. This will allow you to move each speaker exactly the same amount, without having to re-measure each time.
• Proceed with the fine adjustment of the speakers’ position moving them centimeter by centimeter and degree-by-degree until you find the perfect spot and direction that suits Your tastes. Take your time to perform this process, it might take some weeks of trying and errors
• Even small changes in the position of the speakers or the listeners can have a profound effect on the perceived sound quality
Room - Loudspeakers interaction:
• Moving the speakers further from the walls will reduce the general level of bass;
• Moving the speakers closer to the walls will increase the level of bass;
• Space behind the speakers helps to create an impression of depth;
• If the central image is weak, try moving the speakers closer together or toeing them in but do not direct them straight to the listeners.
Fine tuning of the equipment:
• Make sure that all the connections in the installation are correct and secure
• Check the phase of the electrical devices
• Respect the power supply connection priority of the devices: the devices with lower power demand should be the first from the wall
• Connect devices with switching power supply on a different wall plug than devices with analog power supply
Fine tuning of the room:
• If the level bass is uneven, very often is due to the excitation of resonance modes in the room
• Large pieces of furniture can have an effect on the overall frequency distribution inside the room
• To reduce the harshness of the sound, increase the amount of soft furnishings in the room (for example use heavier curtains, carpets, cushions)
• If the sound is dull and lifeless reduce the amount of soft furnishing in the room
• If your room has flutter echo (to test for it clap your hands and listen for rapid repetitions), reduce them by the use of irregular shaped surfaces such as bookshelves and large pieces of furniture
Positionierung der Lautsprecher im Raum
• Bestimmen Sie Ihre Hörposition im Raum.
• Ihre Hörposition sollte nicht zu nahe an der Rückwand des Raumes liegen: Dies könnte das Bassvolumen überproportional steigern und die Genauigkeit der Basswiedergabe reduzieren.
• Die Lautsprecher und Ihre Hörposition sollten ein gleichschenkliges Dreieck bilden. Häufig ist sogar ein gleichseitiges Dreieck optimal.
• Der Abstand der Lautsprecher zueinander sollte zur Gewährleistung einer exakten Stereokanal-Trennung mindestens 1,5 m betragen, in Räumen von 25 qm bis 30 qm besser 2,5 bis 3,0 m.
• Stellen Sie sicher, dass der Abstand zwischen Rückwand und Lautsprecher im Idealfall 0,5 m beträgt und dass der Abstand zu den Seitenwänden nicht zu gering ist.
• Wenn die Lautsprecher zu nahe an den Wänden (Rückwand bzw. Seitenwände) stehen, kann das zu einer überproportionalen Steigerung des Bassvolumens, möglicherweise sogar zu einem Dröhnen führen.
• Die Entfernung der beiden Lautsprecher zur Rückwand sollte gleich sein.
• Die Entfernung zwischen dem linken Lautsprecher und der linken Wand sowie dem rechten Lautsprecher und der rechten Wand sollte möglichst gleich sein.
• Beide Lautsprecher sollten in einem Winkel von 10-15° zur Hörposition ausgerichtet sein (Hier besonders sorgfältig vorgehen und in kleinen Schritten nach innen bis zum akustischen „Kick“ ausrichten – zu viel Einwinkelung kann suboptimal wirken).
. Beide Lautsprecher sollten unbedingt gerade (lotrecht) im Raum stehen, sonst entsteht eine unsaubere Stereo- bzw. Raumabbildung; dies am besten mit einer Wasserwaage nachprüfen.
• Sobald Sie eine erste grobe Position für Ihre Lautsprecher gefunden haben, markieren Sie Punkte am Boden mit Malerband und notieren Sie eine Scala auf diesem. Dies ermöglicht Ihnen, die Lautsprecher gleichmäßig zu verschieben, ohne jedes Mal nachmessen zu müssen.
• Zentimeter um Zentimeter und Grad um Grad finden sie die perfekte Position für Ihren Geschmack. Nehmen Sie sich Zeit, um diesen Prozess durchzuführen: Er könnte Wochen beanspruchen, aber es lohnt sich letztlich!
• Selbst kleinste Änderungen bei der Lautsprecherpositionierung bzw. in der Hörerposition können eine erhebliche Wirkung auf die wahrgenommene Klangqualität haben!
Wechselwirkung Raum - Lautsprecher
• Ein größerer Abstand zwischen Lautsprechern und Wänden führt im Regelfall zu einer Reduzierung des Bassvolumens.
• Wenn die Lautsprecher näher an die Wände gestellt werden, wird das Bassvolumen erhöht.
• Der Raum hinter den Lautsprechern schafft auch einen Eindruck der Tiefe.
• Wirkt das Klangbild in der Mitte zerrissen, stellen Sie die Lautsprecher näher zusammen oder winkeln sie die Lautsprecher minimal weiter in Richtung Hörposition ein.
Feinabstimmung der Anlage
• Prüfen Sie vor Inbetriebnahme, insbesondere nach einem Umkonfigurieren der Anlage und ansonsten regelmäßig, ob alle Verbindungen richtig hergestellt wurden, sämtliche Verbindungskontakte sauber sind und alle Kabel richtig (gepolt) angeschlossen sind.
• Prüfen Sie die Netz-Phase der Elektronik für jedes einzelne Gerät; durch korrekte Phase können erhebliche Klangverbesserungen im Vergleich zu falscher Phase erzielt werden.
• Verbinden Sie Geräte mit digitaler Stromversorgung mit einer anderen Wand-Steckdose als diejenigen, die mit Ringkern- oder Schnittbandtrafo versorgt werden.
Feinabstimmung des Raumes:
• Raumabmessungen, Raumschnitte, Wandmaterialien, auch große Möbelstücke, Bilder und (glatte) Oberflächen können erhebliche Auswirkungen auf die Frequenzverteilung im Raum haben.
• Ist der Klang zu schrill, kann die Verwendung schallschluckender Einrichtungsgegenstände (wie z.B. schwere Vorhänge, Bücherwände, Teppiche, Wandteppiche) helfen.
• Bei dumpfem, leblosem Klang sollten Sie die Verwendung weicher Einrichtungsgegenstände auf ein Minimum reduzieren.
• Prüfen Sie den Raum auf Mehrfachechos. Klatschen Sie in die Hände und hören Sie, ob solche auftreten. Um Echos zu vermeiden, sind unregelmäßige Oberflächen wie z.B. Regale oder größere unregelmäßig strukturierte Möbelstücke hilfreich.
Posizionamento dei diffusori:
• Decidete quale sarà il vostro punto d’ascolto;
• Non fissate il vostro punto d’ascolto vicino alla parete posteriore della stanza: porta ad un eccesso di bassi ed al tempo stesso ne riduce la definizione e la precisione;
• Sistemate le casse ed il punto d’ascolto circa ai vertici di un triangolo isoscele;
• Le casse devono essere equidistanti dal punto d’ascolto;
• Mantenete le casse ad una distanza reciproca di almeno 1,5 m per mantenere la separazione stereofonica;
• Sistemate le casse ad almeno 50 cm dalle pareti.
• Mettere le casse troppo vicine alle pareti fa crescere il livello dei bassi in rapporto ai medi: questo potrebbe dare una sensazione d’impastamento del suono;
• Mettete le casse alla stessa distanza dalla parete posteriore
• La distanza tra la cassa sinistra e la parete sinistra deve essere uguale alla distanza tra la cassa destra e la parete destra
• Puntate le casse direttamente verso le orecchie poi aprite l’angolo di circa 10°-15° gradi in modo che le onde sonore Vi passino di fianco e non Vi colpiscano direttamente;
• Una volta trovata la posizione in prima approssimazione, mettete del nastro adesivo sul pavimento per identificare chiaramente questa posizione. Segnate quindi sul nastro adesivo delle linee a circa 1 cm di distanza l’una dall’altra, questo permette di muovere le casse della stessa distanza senza bisogno di prendere ogni volta le misure;
• Continuate con il posizionamento di fino spostandole centimetro per centimetro e grado per grado fino a trovare la posizione e la direzione perfette. Prendetevi tempo per questo processo: potrebbe essere lungo
• Anche piccoli spostamenti nella posizione dei diffusori o del punto d'ascolto possono avere notevoli effetti sulla qualità sonora percepita
Interazione stanza - diffusori:
• Allontanare le casse dalle pareti generalmente ridurrà il livello del basso;
• Avvicinare le casse alle pareti generalmente aumenterà il livello del basso
• Lo spazio dietro alle casse aiuta a creare una sensazione di profondità sonora;
• Se l’immagine centrale è debole, provate a muovere le casse più vicine l’una all’altra oppure inclinatele di più verso il punto d’ascolto senza però dirigerle direttamente sull’ascoltatore;
Messa a punto delle elettroniche:
• Assicuratevi che tutti i collegamenti siano corretti e ben fissati;
• Controllate la fase dei componenti
• Rispettate la priorità di alimentazione dei componenti: quelli che hanno bisogno di meno potenza vanno attaccati più vicini alla parete
• Connettete i componenti con alimentazione a switching possibilmente in un'altra presa a muro rispetto a quelli con trasformatore toroidale
Messa a punto della stanza:
• Se il livello dei bassi non è coerente è spesso dovuto all’eccitazione di determinate risonanze nella stanza; anche piccoli spostamenti nella posizione della cassa possono avere grossi effetti su come queste risonanze influenzano il suono;
• Mobili di una certa dimensione possono avere una discreta influenza sulla generale distribuzione delle frequenze nella stanza;
• Per ridurre l’asprezza del suono, aumentate l’arredamento morbido nella stanza: aggiungete tende più pesanti, tappeti, cuscini, e così via;
• D’altro canto, se il suono è opaco e senza vita riducete l’arredamento morbido;
• Se la stanza invece ha un’eco fastidiosa (basta battere le mani per rendersene conto) si può ridurre usando mobilio di forma irregolare come ad esempio librerie, mobili di grandi dimensioni

 |
Important safety informationWichtige SicherheitsinformationenImportante informazione di sicurezza
Magnetic stray fields. The speakers units create diffuse magnetic fields that extend beyond the boundaries of the cabinet. These magnetic fields might influence magnetic sensitive articles (screens, computer drives, magnetic cards…) and might be influenced by mobile telephones. • We recommend therefore You keep magnetic sensible articles at least 0.5m away from the speaker. Positioning risks: • Ensure the speakers stand firmly on the floor. • Whenever possible fit the spike feet supplied after you have optimized the positioning • The spikes are designed to pierce through carpets to the floor surface in order to grant to the loudspeaker the best possible stability • Blumenhofer Acoustics opted for a 3 spikes system in order to facilitate the setup of the loudspeakers. • If the unit is to be placed on a vulnerable surface, such as a wooden floor, place the protective disc under each spike • Check that there are no cables under the carpet that may be damaged by the spike feet • Do not walk the product on the spike feet as this may cause them to become detached from the cabinet and cause damage • Take care not to impale yourself with the spike feet when moving the product • Die Lautsprecher müssen fest und gerade (lotrecht; ggf. Prüfung mit Wasserwaage) auf dem Boden stehen. • Befestigen Sie die beiliegenden Spikes nach Möglichkeit erst dann, wenn Sie die optimale Position für Ihre Lautsprecher gefunden haben. • Die Spikes sind so ausgelegt, dass sie durch einen ggf. verlegten Teppich hindurchgehen und auf der Bodenoberfläche darunter aufliegen, um dem Lautsprecher die bestmögliche Ankopplung an einen festen Untergrund zu geben. • Blumenhofer Acoustics hat sich für ein 3-Spikes-System entschieden, um die Positionierung zu vereinfachen und die Stabilität zu erhöhen. • Sollten die Lautsprecher auf einer empfindlichen Oberfläche stehen, wie z.B. auf einem Holzfußboden, legen Sie bitte die Schutzscheiben unter die Spikes. • Vergewissern Sie sich, dass unter dem Teppich keine Kabel liegen, die durch die Spikes beschädigt werden könnten. • Bewegen Sie die Lautsprecher nach Möglichkeit nicht auf den Spikes, da diese sich hierbei vom Gehäuse lösen könnten, was zu Beschädigungen der Bodenoberfläche führen könnte. • Achten Sie darauf, dass Sie sich beim Heben der Lautsprecher nicht an den Spikes verletzen! Campi magnetici diffusi: Le casse acustiche creano campi magnetici diffusi che si estendono al di fuori della cassa acustica stessa. Questi campi magnetici possono influenzare un determinato tipo di strumenti sensibili ai campi stessi (televisori, computer, lettori di dischi, carte magnetiche, …). D’altra parte potrebbero subire l’influenza dei telefonini. • Tenete oggetti ed apparecchiature sensibili ai campi magnetici ad almeno 50 cm dalle casse Attenzione nel posizionamento: • Assicuratevi che i diffusori siano appoggiati saldamente sul pavimento • Dove fosse possibile fissate i piedini forniti dopo aver posizionato in modo ottimale i diffusori • I piedini forniti sono progettati per passare attraverso il tappeto ed arrivare fino alla superficie del pavimento, per dare maggiore stabilità al diffusore • Se il diffusore deve essere collocato su una superficie delicata, come un pavimento in legno, usate il dischetto protettivo sotto ogni punta • Controllate che non ci siano cavi sotto il tappeto che potrebbero venire danneggiati dalle punte • Non spostate il sistema con le punte applicate perché i piedini conici potrebbero staccarsi dal cabinet e danneggiarlo • Fate attenzione a non trapassarvi i piedi con le punte |
Q

